The wireless Hosted Network feature in Windows 7 lets anyone with a supported Wi-Fi adapter and driver become a wireless AP for other Wi-Fi users, while also having the ability to connect to another wireless network.
Back in 2002, the research department at Microsoft started experimenting with the virtualization of 802.11 wireless adapters under the project code name VirtualWiFi. They discovered a way to make a single physical Wi-Fi adapter look like multiple adapters in Windows.
VirtualWiFi lets users simultaneously connect to multiple wireless networks with only one wireless card. They hoped this technology could be used in a variety of applications, including wireless diagnosis and troubleshooting, Wi-Fi mesh networking, virtual access points, and wireless repeating.
What is a wireless Hosted Network?
Though the VirtualWiFi project disbanded before the feature was fully implemented, Microsoft has included some of the underlying functionality in Windows 7 and Windows Server 2008 R2. Microsoft coined the name, wireless Hosted Network, for this new feature.
The wireless Hosted Network feature uses the VirtualWiFi technology along with a software-based access point (AP) feature. Thus, it lets anyone with a supported Wi-Fi adapter and driver to become a wireless AP for other Wi-Fi users, while also having the ability to connect to another wireless network. It also includes a DHCP server, so users automatically receive an IP address.
One use of this new feature might be to extend a hotel’s paid-Internet connection to other Wi-Fi users for free—not that I advocate this practice. Another more legitimate use might be to “repeat” a network’s signal. In any case, it serves as a quick mobile AP.
Others might suggest that you can use this virtual AP as a Wi-Fi hotspot. Just remember, even though the wireless Hosted Network is encrypted, giving out the key comprises the security. People with the key can snoop on the other users that are connected. Plus the users might give the key to others.
End-users can interact with the wireless Hosted Network via the netsh command-line tool. Software developers can also write front-end utilities, like Connectify, or use the capabilities in other third-party applications. In this article, we are going to experiment with the netsh tool.
Getting started with wireless Hosted Networks
In order to use the wireless Hosted Network feature, your wireless adapter must be using drivers certified for Windows 7. If Windows detects a supported adapter, it will automatically add a connection to the Network Connections window, named Microsoft Virtual WiFi Miniport Adapter, such as Figure 1 shows. If multiple supported-adapters exist, Windows will automatically choose the one to use for the wireless Hosted Network.
Figure 1.
Microsoft requires all wireless Hosted Networks to use WPA2-PSK (AES) encryption. However, there is not a mechanism put in place to prevent file sharing. Hosts and clients should manually protect shares if not all users can be trusted.
In addition, keep in mind that wireless Hosted Networks do not automatically restart after the computer resumes from sleep, hibernate, or restarts. However, if used, a third-party utility might initiate a reconnection. If you manually start the wireless Hosted Network again, Windows will use the previously entered network details though.
Manually create a virtual AP with netsh
If you want to experiment with the wireless Hosted Network feature with text commands, click the Start button, enter “cmd” and hit Enter. Once the Command Prompt window appears, you can enter the following to set the network details:
netsh wlan set hostednetwork mode=allow ssid=YourVirtualNetworkName key=YourNetworkPassword
Of course, replace the SSID and key placeholders with your desired network name and WPA2-PSK encryption key.
Before you enable the Hosted Network, you can configure the real network adapter to share its Internet access using the Internet Connection Sharing (ICS) feature of Windows. This way people connecting to the virtual AP will receive Internet access. You can leave the Command Prompt open so you can start the Hosted Network later.
To enable ICS, navigate through the Control Panel or Network and Sharing Center to bring up the Network Connections window. Then right-click the network adapter that’s connected to the Internet and select Properties. Then select the Sharing tab, check the Allow other network users to connect through this computer’s Internet connection, choose the Hosted Network Connection from the drop-down listbox, and click OK. See Figure 2 for an example.
Figure 2.
Now return to the Command Prompt and enter the following to enable the Hosted Network:
netsh wlan start hostednetwork
To manually turn the Hosted Network off, enter the following:
netsh wlan stop hostednetwork
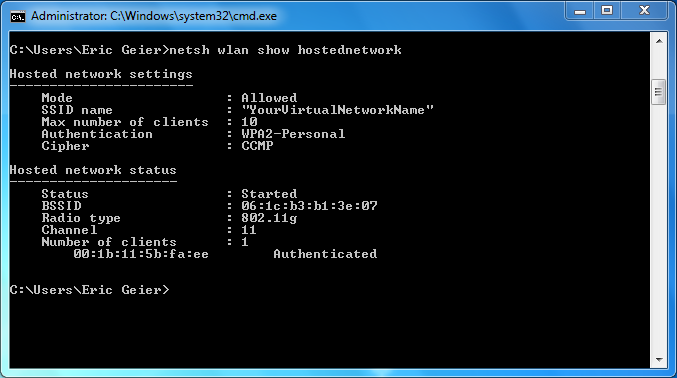
To see the Hosted Network details (see Figure 3), including the MAC addresses of connected users, enter the following:
netsh wlan show hostednetwork
To change the WPA2-PSK key, you can enter the following:
netsh wlan refresh hostednetwork YourNewNetworkPassword

Figure 3. Click to enlarge.
It’s a virtual AP
Now others nearby should see the Hosted Network appear in their list of available wireless networks. They can connect like normal and enter the encryption key when prompted.
Remember, you’ll have to manually start the Hosted Network again, if desired, after rebooting the computer. Most importantly, remember sharing isn’t blocked; make sure you only invite people you trust.
- Can You Be Tracked Down Just by Your IP Address? - September 21, 2022
- How To Hide Your IP Address - September 21, 2022
- Orange Light On TP-Link Router – What it Means and How To Fix - September 21, 2022