By Aaron Weiss
Extend your range by turning a router into a Wi-Fi signal repeater — it will even work as you move from WLAN to WLAN.
January 19, 2007
Related Articles
- DD-WRT Tutorial 4: Defining Priorities with QoS
- DD-WRT Tutorial 3: Building a Wireless Bridge
- DD-WRT Tutorial 2: Extend Range with WDS
- DD-WRT Tutorial 1: Static DHCP
In the old days, when you wanted to extend the range of a wireless access point, you had to set up a WDS, or wireless distribution system, coordinating two or more WDS-capable routers. But those days are gone – and by “those days,” I mean 2006.
Setting up a WDS is a perfectly respectable thing to do. In fact, we earlier demonstrated precisely how to do it our second DD-WRT tutorial. But a WDS can be a needy thing. At a minimum, each router in the network must support WDS. For the most reliable results, each router should be the same model running the same firmware.
In the real world, you might own only one router which can run DD-WRT. Thanks to the new V24 beta firmware, a single DD-WRT router can be set up as a wireless repeater. Unlike a WDS, your DD-WRT router can now receive and redistribute a wireless signal from a generic AP.Typically, you would use wireless repeater mode to rebroadcast a signal too weak for your wireless clients to pick up reliably – assuming that your DD-WRT router can pick up the host AP, of course. In a test case, I successfully repeated a host AP with a signal strength of only 9% as seen by the DD-WRT router – so low that the host AP wasn’t detected at all by a laptop’s integrated wireless.
Wireless repeater mode also groups your local clients into their own subnet – a potential feature (for privacy) or a potential hassle (for LAN routing), depending on your needs.
Caveat Router
Because wireless repeater mode is a new feature, and technically still in beta, using it puts you on the leading edge of DD-WRT technology. This also means you may run into problems with the limitations of wireless repeater mode, and there are some.
At the time of this writing, wireless repeater mode does not yet function in bridged mode. This means that, as noted earlier, clients connected to your DD-WRT repeater must be inside their own subnet, preventing them from seeing clients connected to the host AP.
For example, if your host AP assigns clients to the 192.168.0.x subnet, your wireless repeater will have to assign its clients to another non-overlapping private subnet, such as 10.0.0.x. While clients on both subnets will be able to access the Internet (assuming the host AP has Internet access), clients on the two subnets cannot see each other. For some LAN configurations this is an undesirable problem, and you’ll have to consider WDS or a wireless bridge scenario as alternate solutions, each with their own limitations.
To set up a wireless repeater yourself, you’ll first need to upgrade your DD-WRT compatible router to the latest V24 beta. If you are currently running a DD-WRT setup, take a moment to back up its settings before flashing to V24 (Administration/Backup), in case you later decide to revert to your original configuration.
Router Setup
Take note of any wireless security currently enabled on your host router. If you are using WEP, note your passphrase and key length (64-bit, 128-bit, etc.). If using WPA or WPA2, note your passphrase. Later, you’ll need to use these to set up your repeater. Note that because DD-WRT V24 is still a beta, your mileage may vary when it comes to repeating a secured host router. Users of earlier betas reported a number of problems, but these seem to be smoothed out with the latest releases (the V24 1/15/07 release, as I write this).
Also make note of the SSID of the host AP you want to repeat. Alternatively, you can scan for available APs from within the router’s administration interface as well.
You will need to access the administration interface of the DD-WRT router you’re setting up as the repeater. Connect a wired PC to the DD-WRT router. Be sure to disable any wireless adapter on your PC for now, and plug the Ethernet cable into one of the LAN (not WAN) ports on your DD-WRT router.
Step By Step
Assuming your DD-WRT is set to factory defaults, its IP address is 192.168.1.1. If your client PC is configured to receive an IP automatically, it should be assigned an address by the router.
Step 1. Open a browser on your PC and connect to the DD-WRT router – its default address is http://192.168.1.1. The default login is root and password is admin. Of course, you should change these. If you don’t, you’ll have bad dreams involving Sally Struthers and bathing.
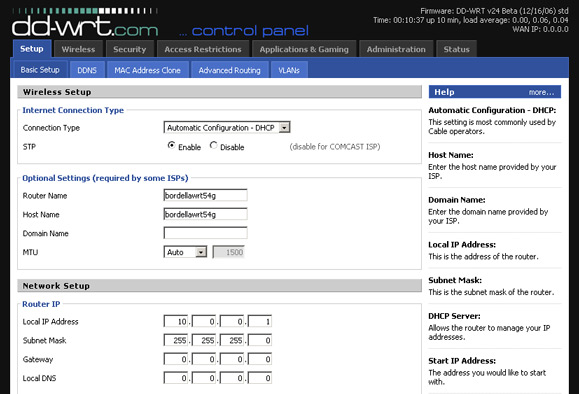
Step 2. Click Setup/Basic Setup. You can leave Connection Type at its default, “Automatic Configuration – DHCP.” You can leave the router and host name fields at default if you like, or customize them as we did.
The most important setting here is the Local IP Address. This must be a different subnet than that which the host AP is on. Our host AP is on 192.168.1.1, which was also the default for this DD-WRT router. Thus, we’ve changed the DD-WRT router to 10.0.0.1.
You can leave the remaining settings alone – the DHCP enabled, etc. – and click Save Settings at the bottom of the page. Your router will reboot.
Because it will restart with a new IP address, you will need to repair the client connection at your PC to join the new subnet. (Otherwise, you won’t be able to access the administration page any more.)
In Windows XP, navigate to Control Panel/Network Connections, right-click on the Local Area Network connection, and choose “Repair” from the pop-up menu.
Once reconnected to the router, you should open your browser to its new address – in this example, http://10.0.0.1.
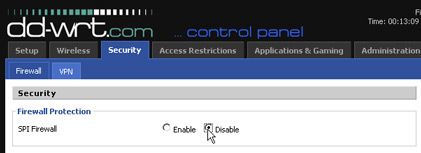
Step 3. Click Security/Firewall and click to Disable the SPI Firewall. If you want any special firewall settings, you should configure these on the host router.
Step 4. Click Wireless/Basic Settings. For Wireless Mode change the selection from its default “AP” to “Repeater”.
Unless your host router is set to G-only mode, leave Wireless Network Mode set to “Mixed”. If your host router is set to G-only, likewise choose “G-Only” here.
Set the Wireless Network Name (SSID) to the SSID of your host router. If you don’t know it and for some reason can’t figure it out, we’ll show you how to scan for it a little later.
Leave the remaining settings at their defaults. Some claim that setting SensitivityRange (ACK Timing) to 0 improves performance, which you might experiment with once the repeater setup is tested and working.
Important: Now click Save Settings. The page will then refresh.
At this point, you have essentially set up the DD-WRT router in wireless client mode. Your PC that is wired to the router should be able to access the Internet, assuming that the host router can.

The next step is to enable the DD-WRT router to behave as a wireless AP in addition to being a wireless client. That’s why they call it a repeater, mmmkay?
To perform this trick, you will create a Virtual Interface. This will behave as a software AP, broadcasting its own SSID and bridging external wireless clients to the router, which is itself a wireless client to the host router in this configuration.
Click the Add button and the page will refresh again, with new fields for configuring the Virtual Interface.

Fill in Wireless Network Name (SSID) with the name you want for the repeated wireless network. For best results, this should be different from the SSID for the host router. You will see this SSID available when your wireless clients scan for access points.
Leave the remaining fields at their default values as seen here, and be sure to click Save Settings.
Step 5. Click Wireless/Wireless Security. In repeater mode, you need to consider two dimensions of security:
First, is security enabled on the host router that you’re repeating? If yes, you’ll need to configure security on the DD-WRT router’s “physical interface” to match.
Second, do you want security between your repeater and local wireless clients? If so, you’ll need to configure the kind of security you want on the DD-WRT router’s “virtual interface” and, of course, on each individual wireless client that associates with the repeater.

In this example, we’re using WPA2 security to connect to the host router. Obviously, you must enter the correct shared key as configured on the host router.
We’re also using WPA2 security for the repeated signal. Note that on the Virtual Interface, we are choosing a shared key, one which we’ll need to use on each wireless client PC.
In theory, you can select a different security mode for your repeated network (the virtual interface) than you are using with the host router. You could choose to use no security on the host router, and secure only the repeated network; or you could use security only at the host router and none on the repeated network.
Users report varying success mixing and matching security modes, most likely due to DD-WRT V24 still being a maturing beta.
Ideally, you should initially set up your repeater with no security for either interface. This assumes that you have administrative access to your host router if it is currently secured. Once the repeater is verified as working, add each layer of security separately to best pinpoint any problems.
Step 6. Scan for a host router as an alternative to manually entering its SSID in Step 4.
Click on Status/Wireless and scroll to the very bottom of the page. There you can click on Site Survey, which will pop up a window showing available wireless networks.

In this example, the DD-WRT router detects one network with SSID bordella available. The router is open (no security), so to repeat it, simply click “Join” to create the association.
Troubleshooting
If you can’t seem to access the Internet from a client connected to the repeater, first check that the repeater is successfully connected to the host router.
Click Status/Router and scroll to the bottom of the page. There you will see a summary of the DD-WRT router’s WAN connection – has it received an IP address, DNS and gateway from the host router? If the IP is 0.0.0.0, it has not, and your client connection between the DD-WRT router and host router is not working.
Some people find it helpful to configure the DD-WRT as a simple wireless client first, before setting it up as a repeater. You can configure DD-WRT as a client on the Wireless/Basic page. As a client, you do not have a virtual interface, since the client can only share the host router through wired connections.
If client mode does not work, be sure to check the security arrangement between the host router and the DD-WRT router. Once client mode works with a wired PC, you can then change DD-WRT from “client” to “repeater” and add the virtual interface.
Advanced Repeating
If you’re feeling especially adventurous, it is possible to set up your repeater to dynamically repeat any open (unsecured) host AP in the vicinity. The primary application for this would be to use your repeater in an, ahem, mobile configuration.
Click on Wireless/Basic and set the SSID for the Physical Interface to blank. Now click Administration/Command and enter into the command field:
nvram set wl_ssid=””
Click Save Startup and restart the router. Now DD-WRT will behave as a promiscuous repeater, which will consort with the first open AP it finds. Also, “promiscuous repeater” makes a great band name.
For the especially sophisticated, you can download a DD-WRT script called AutoAP, which can dynamically detect and repeat an available AP with the strongest signal, and can even associate with secure APs if you provide a set of keys to choose from.
- How to Protect Your Wi-Fi Connection - May 3, 2024
- 5-9-14 Eyes Countries & What they mean - September 20, 2022
- A List Of The Best Free and Public DNS Services - September 19, 2022