There’s a slogan for Visa that says they’re “everywhere you want to be.” My real world experience proves otherwise, especially when “where I want to be” is spending less than $10 at the convenience store down the street where they don’t believe in accepting credit for such trivial transactions. Your wireless network should also be everywhere you want to be. But unless you live in a yurt, it probably isn’t. In the real world, signal propagation varies, and your average multi-story home or office often suffers from weak or dead spots in wireless access.
A Wireless Distribution System, or WDS, is a cheap and easy way to extend your wireless network coverage. It’s cheap, because you can set up a couple of sub-$60 routers with the open-source firmware DD-WRT, including the Linux-powered Linksys WRT54GL (only $56 these days on Amazon.com) and other compatible routers. It’s easy, because you need only apply a few configuration settings to your routers, creating a repeater bridge to extend your wireless network.
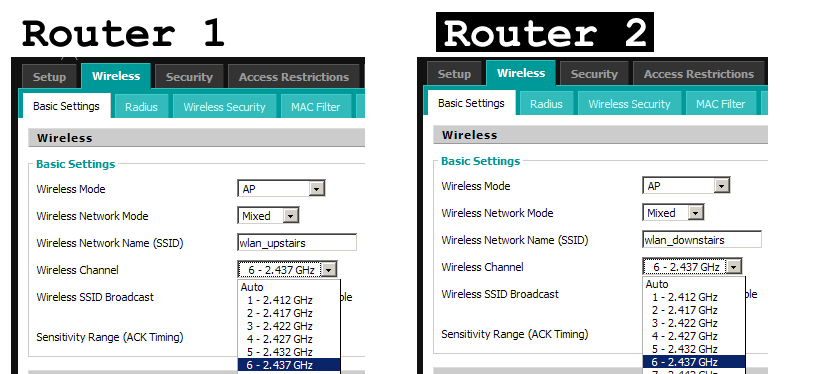
In my fictional house above, “router 1” is connected to the broadband service. It delivers a strong wireless signal to a PC on the same floor. But due to the construction and size of the house, its signal weakens rapidly downstairs. So I’ve set up a WDS router downstairs to boost the signal for lower-floor dwellers.
On the second floor, “router 2” acts as both a wireless client and an access point to receive and re-transmit the signal from router 1, the key word being re-transmit. There is a cost to WDS — clients associated with router 2 will see only half the bandwidth as those associated with router 1. For a wireless G network where the primary usage is external broadband, this presents little sacrifice, since the typical U.S. broadband connection is much slower than the wireless LAN, even at half-speed.
You could add a third, fourth and more routers to extend the WDS even further — but each one would again divide the bandwidth in half to its clients.
WDS Rules & Regulations
There are a few rules to implementing a functional WDS network. For optimal compatibility, you should use the same routers throughout — or, in this case, the same firmware, running DD-WRT v23 on both routers.
Both routers must communicate on the same wireless channel. Both routers must be configured to the same kind of 802.11 network, whether B, mixed B/G, or G. An exclusive G network must use channel 1, 6, or 11.
If you use WPA security, you must set up both routers as exclusive G networks. DD-WRT does not support WPA2 in WDS. WEP security can be used in a network with B support.
WPA security also requires identical SSID assignments for both routers. If using WEP or no security, you can opt to assign different SSIDs to each router. You may have more control over which AP your clients connect to if each has a different SSID — some client managers, including Windows XP’s Wireless Zero Configuration, don’t disambiguate APs which share the same SSID and may not always roam with the strongest signal.
You Need to Know…
Before diving in and changing your routers’ firmware settings, you need some information that will come in handy later. First, log into the DD-WRT administration interface on router 1, which is connected to the broadband service.
- DNS address(es): Click on the Status/Router menu and scroll to the bottom, Internet. There you will see DNS 1, 2, and 3 as provided by your ISP. Note any addresses that appear here.
- LAN IP for your Internet-connected router: click on Status/LAN and note the IP Address listed under Local Network.
- The wireless MAC ID for each router: click on Status/Wireless and note the MAC address at the top of the page. This unique address identifies this router. Note this address for each router in your WDS.
Back Up Your Settings
Before messing with the settings on your Internet-connected router, let’s back up the current settings — which presumably work properly, or you wouldn’t be reading this article online. Should your new configuration go awry, you can restore your saved settings and get back on the Web to research the problem or e-mail us an angry rant (better yet, share it in the forums).
Click Administration/Backup and then click the Backup button at the bottom of the page. Your browser will then save a file. Should you need to restore your settings, revisit this page and supply the backup file to the Restore Settings dialog.
Router Juggler
The easiest way to follow along with this tutorial is to configure both routers at the same time. Ideally, connect a portable or other secondary computer to the second router’s administration interface while accessing your primary router from a LAN computer.
Ideally, you should reset both routers to a clean slate — just in case a setting somewhere might interfere with WDS. You can restore your routers to factory defaults by clicking Administration/Factory Defaults and then clicking Save Settings.
WDS Step-By-Step
Step 1: Set the LAN IP address for each router. Click Setup/Basic Setup and scroll to the Network Setup section. The default Local IP Address for your router, after resetting factory defaults, will be 192.168.1.1, which is usually fine. (The examples here use 192.168.0.1, but it doesn’t make any difference: the first three octets of the IP address have to match for the nodes to communicate on the network.)
Assign a new Local IP Address to your second router. The logical choice would be 192.168.1.2, or, as pictured below, 192.168.0.2.
Set the Gateway address for router 2 to the Local IP Address for router 1. Here, that’s 192.168.0.1.
Step 2: On the same configuration page, scroll down to Network Address Server Settings (DHCP). I enabled the DHCP server on both routers, but set them to assign addresses in different ranges. Router 1 will assign addresses starting at 192.168.0.100 with a pool size of 25 users. Router 2 starts assignments at 192.168.0.200 with another 25-user pool.
You can set these parameters however you like, so long as your address pools don’t overlap. With this setup, you can quickly tell from any client PC which access point is associated, based on the current IP address. That’s sometimes helpful for troubleshooting.
Router 2 needs the DNS entries assigned by your ISP. You saved these earlier when reading the “You Need to Know” section above.
Step 3: Disable the Internet connection on Router 2 only. Click Setup/Basic Setup and under Internet Setup, set the Connection Type to “Disable.”

Step 4: Disable the firewall on Router 2 only. You don’t need this to be active because your second router is simply passing traffic to your primary router, whose firewall is active by default. Running both firewalls at the same time could cause unreliable behavior. Click Security/Firewall and check Disable beside SPI Firewall. Be sure to click “Save Settings” at the bottom of the page for this to stick.
Step 5: Set the wireless network mode, SSID and channel for both routers. Click Wireless/Basic Settings. Set your Wireless Mode to “AP” for both routers.
Choose a “G-only” network mode only if you do not need to support any B mode clients. Remember that if you choose a mixed or B-only network, you cannot use WPA security with WDS, and therefore must use either WEP security or none at all.
Set the SSID for each router. Remember that if you choose a G-only network and use WPA security, the SSID must be identical for both routers. Otherwise, opt for different SSIDs, as shown here. This ensures I can specify exactly which AP — upstairs or downstairs — to connect to.
Set the same wireless channel for both routers — do not select “Auto.” If you choose a G-only network, you must use the non-overlapping channels: 1, 6 or 11 only. If any unrelated wireless networks are nearby, you should choose a channel which doesn’t conflict with it.
Step 6: Disable wireless security, even if just temporarily. Best to get your WDS up and running without security first — fewer factors to troubleshoot. Click Wireless/Wireless Security and choose Security Mode “Disable.”

Step 7: Now we can define the WDS associations between both routers. Click Wireless/WDS. This page shows a series of blank entries for WDS relationships.
On router 1, define the relationship with router 2. Select “LAN” from the drop-down menu. Enter the wireless MAC address for router 2, which you saved previously in the “You Need to Know” section. Optionally, enter a label for this WDS association.
On router 2, repeat the same procedure, entering the MAC address for router 1, and a label that is appropriate (or inappropriate — hey, it’s your router).
Be sure to click “Save Settings” at the very bottom of the page.

Fire It Up
Your WDS should be ready to go. As a first test, position both routers near one another so you are certain the signal strength is good. Using a client PC or portable computer, you should be able to associate with either router and access the Internet.
Next, position the second router toward the outer edge of the first router’s range. It may take several experiments, moving incrementally farther, to find the best location for the second router. Ideally, it should be close enough to the first router that it receives a strong signal, yet far enough that it extends your wireless coverage appreciably — which is, after all, the whole point of this WDS network.
When you confirm that your WDS is working, you can revisit enabling wireless security. Be sure to choose the exact same security protocol parameters for both routers. Remember that WDS on the DD-WRT firmware does not currently support WPA2, and only supports WPA in a G-only network.
Some users report problems with port forwarding from their primary router to wireless clients associated with their second router. If you use port forwarding and experience this, try adding your second router to your primary router’s DMZ (define). Click Applications & Gaming/DMZ and enter the IP address of your second router, click Enable and “Save Settings.”

And that should do it. Happy repeating.

- Can You Be Tracked Down Just by Your IP Address? - September 21, 2022
- How To Hide Your IP Address - September 21, 2022
- Orange Light On TP-Link Router – What it Means and How To Fix - September 21, 2022